Gnats and stink bugs: Some cures
These are the only 2 pests that have been a problem, and the infestations started recently.
These methods work, because I used them to good success.
For gnats, get a small glass jar and put in about 1/2″ of apple cider vinegar, and add a drop of dish soap. The dish soap breaks the surface tension of the water, and the gnats drown.
For stink bugs, a war I am fighting with them now because they are somehow getting inside a screened in deck, I use water and Dawn dish soap (concentrate). Add a couple good squirts to a gallon of water, and spray the bugs. It works on contact, usually in a few seconds.
With the exception of vine borers in my zucchinis, I had no other insect problems this year.
I hear this also works for wasps, yellow jackets etc but I think I’ll stick to wasp killing sprays for that.
Things are wrapping up
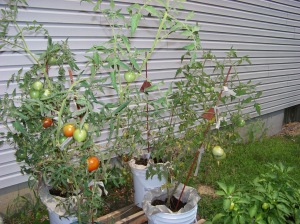
The tomatoes were hit hard by blight. The self-watering system worked, however. I never had to water anything manually. I will use that system again. If anything, the plants were being stunted by too much water, and I got new growth only after I lowered the water level.
I need to pick a better variety of tomatoes for this USDA zone. I used indeterminate varieties and should have gone with determinate. Then I could have had a 2nd planting (transplanting suckers) and a second crop.
Compost tea is good, but I should have added a balanced fertilizer.
I planted beans in my compost pile as well as in containers that held some garlic that I harvested earlier. Beans add nitrogen, and I hope this will add balance to next years compost, in which I used mostly shredded leaves, which are mostly carbon. As a bonus, I might get a bean harvest for some winter chili. I’m getting a lot of tiny seed pods on these plants. If not, beans are cheap.
I will not reuse the soil that held the tomatoes for growing tomatoes next year. No point in having the same blight problems. I understand this mold(?) can live in the soil for 3 years. I’ll use it to grow something else.
You can get a harvest from store bought garlic
I bought a few bulbs over the winter to plant as an experiment. Towards the beginning of spring, while it was still cold, I planted them in small cups.
Take apart the bulbs into individual cloves, and plant the largest ones pointy side up. Add occasional water and let them grow.
I don’t remember when I planted them in outdoor containers, but it doesn’t matter. They tolerate the cold weather just fine. It seems most people plant them in the fall to harvest the following summer. I didn’t do it that way.
The cloves I harvested were small, but the ones I bought were small too. They are hanging up to dry.
Copper Sulfate (CuSO4) finished
I had to find a way to remove the CuSO4 from the bottom of the jar. I used a syringe that is used to inject spices into meat, and a length of 1/4″ hose. I then put it into another jar.
It came out cloudy with some precipitate at the bottom. I used a coffee filter to remove it. But that didn’t solve the cloudiness problem, so I looked up some info and found citric acid would remove it. I used about 5 drops of lime juice and let it sit for a few hours. It cleared it right up, with some more precipitate at the bottom. I filtered it, and now it’s clear blue.
It’s not as dark blue as I expected, but it wasn’t bad for a first effort, and it’s usable.
I think I am going to pull up 1 or 2 plants that are basically dead, and transplant some suckers from a plant that isn’t affected by this fungus. Then I will use this CuSO4 (and spray baking soda + water) as a preventative measure. I still have time to get more plants going, if I start them from suckers instead of seed.
I need to remember this for next year.
Making copper sulfate
UPDATE:
I let the reaction run overnight. I was expecting to see an even darker blue solution form, but it didn’t. I used some telephone hookup wire for electrodes, and I should have use something thicker, especially for the bottom electrode. The exposed copper wire at the bottom of the jar no longer existed (or it corroded and is sitting on the bottom of the jar). Stupid mistake that I should have known better than to make, The copper for copper sulfate has to come from somewhere… So I am using a wire from an appliance power cord, and am also using a 12v power supply.
I’m making a batch now, and getting results.
This is what I will use on my tomato plants to control fungus. But use CAUTION! It is a hazardous chemical and must be used with caution. And clean all fruit before eating it.
I’m using the directions found here: http://www.scienceforums.com/topic/21314-magnesium-sulfate-electrolysis/#entry314037
But I had to make some minor substitutions. I haven’t blown up anything, and the fire dept. is still resting easy. For now.
Here are the differences:
I am using a 3v power supply. I’m sure I have a 5v or 9v, but the 3v was handy.
I’m using copper wire for both electrodes. I don’t have a graphite electrode I can improvise.
A coffee filter seems to work fine.
It took about 1/2 hr before I started noticing a blue color in the solution near the bottom of the jar. It is getting a deeper blue over time. I’ll let it run overnight. That is the copper sulfate forming.
So, all it takes is some plain epsom salt (magnesium sulfate), copper wire, a jar, a few rubber bands to hold the wires to the outside of the jar, a power supply or batteries, some pure water, clamps to hold the filter in place (do not let the filter hang over the lid of the jar, or the solution will wick over the top of the jar and you will have a mess to clean up. Use clamps (clothes pins work) to hold the filter in place on the INSIDE of the jar).
It’s easy.
Tomato leaf spot
Some of my plants have it pretty bad.
I think I was also giving them too much water. It seemed to stunt their growth. So I lowered the water level and am starting to see new growth after a few days.
This leaf spot is a fungal infection that is the cause and copper is the treatment.
Here are some more organic treatments http://www.veggiegardener.com/12-homemade-natural-remedies-for-the-garden/
I’m also going to try my hand at making copper sulfate using these directions It seems simple and cheap.
Picture update on the system I use
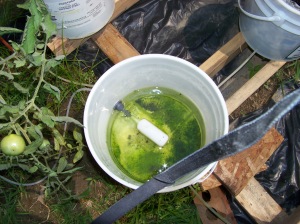
That pic is the bucket that contains the float valve. The waterlines branch out from this bucket to all other buckets. I removed the lid to show the inside. The valve sets the water level of all the buckets that are hooked up to it, if they set on a level surface.
I used some 2×4 precuts to make them level by building a rack. It’s easier than leveling the ground.
There is some algae backing up into the bucket. We have had a lot of rain lately, and the overflow from the planted buckets flows back into this supply bucket thru 1/4″ clear hose and flows out thru a hole drilled into this bucket just above the waterline. This hose is where the algae is coming from, since light penetrates the hose. If I used black hose, this wouldn’t be a problem because algae requires sunlight to grow.
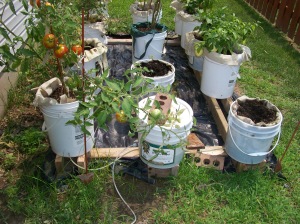
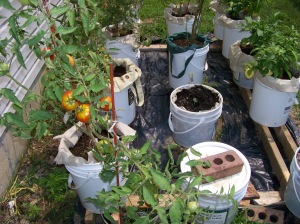
Here is the system. I used heavy duty trash bags underneath in order to control weeds.
The empty buckets were zucchini, after vine borers got to them. I replanted and hope to get something out of them.
I also disconnected the pepper plants, because they were getting too much water. I’ll water them by hand from now on.
I like this system. I get good growth and don’t have to worry about watering the containers. Tomatoes use a lot of water, and you don’t want them to go without, even for a short period of time. When I used just the buckets last year, I’d have to water them at least 3 times a day, and even that wasn’t enough to keep them properly watered.
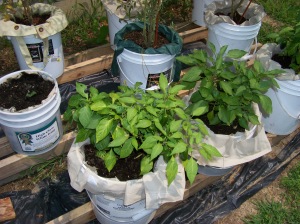
Peppers.
Tomatoes.
A water pump that uses no electricity
Just watched these. It won’t help me, but it might help you. perfect for those that are off-grid, or want to be more off-grid
Update
1) I found that reserving about 1 qt of compost tea and adding it to a new batch will speed up the process. Before I did this, I’d let it run for 2-3 days before using, and there was barely any foam floating on top of the solution (evidently a sign of microorganisms reproducing and eating). Now it takes less than 24 hours.
2) When it comes to using this tea, I can tell the difference already. Tomato and pepper foliage is greener, and lettuce that is growing in small planters is much better. It gave the lettuce a very noticeable boost.
3) My experiment with improvised hydroponics (written about here) was a failure. The lettuce didn’t die, but it didn’t grow either. The roots were so fragile that just lightly dragging them across my finger would tear them up.
Making some compost “tea”
This is supposed to really help the plants by providing microorganisms that break down nutrients so they are made available for the plant to use,
Here is a video that shows a comparison. It speaks for itself,
I don’t have an air pump, but I do have an aquarium water pump. That will keep it oxygenated and help the bacteria etc multiply. I let it run last night to help get rid of the chlorine in the water. I then added the compost and a few tablespoons of sugars (table, honey, and corn syrup) this morning and will let it run overnight.
For the compost, I’m using some of the leaves from last year that have broken down into compost. I also have a lot of worms available for making some vermicompost over the winter.
Also, I have at least 2 tiny tomatoes on the vines. And the peppers have so many buds that the plants will not be able to physically let the peppers grow to full size. They’re just packed with buds. So I have been removing those buds until the plants get bigger.
